

Official Guide · Edition 1.1
Plugin Builder
From idea (or your old custom GPT) to installed plugin, in plain words. Import or fill in the plan, download your zips, install in ChatGPT or Claude. No code. No experience needed.
01What you bought
The Plugin Builder turns your idea (or your old custom GPT) into a real plugin package that ChatGPT, Claude and Codex can install. You fill in a form; it builds the files.
Plugin Builder · $97 (launch price $47, tax included)
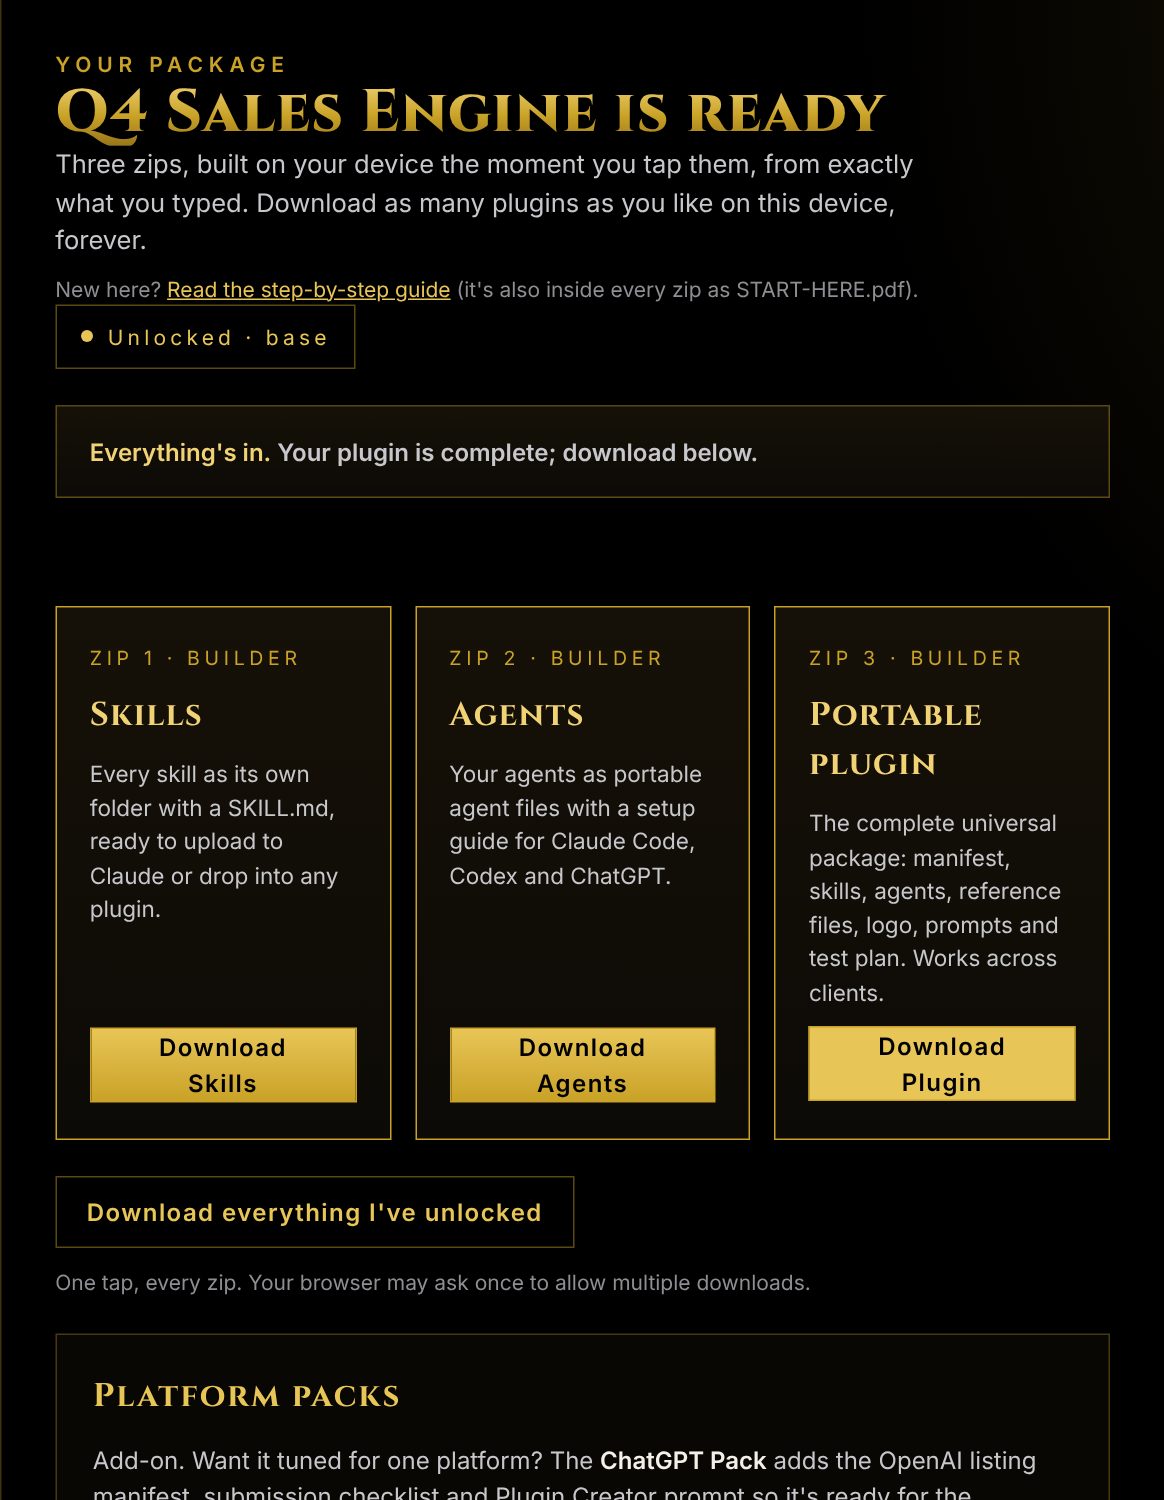
Lifetime access. Three downloads for every plugin you build: the Skills zip, the Agents zip and the Portable Plugin zip (the full package).
Platform Packs · add-ons
ChatGPT Pack and Claude Pack. Each one adds that platform's own manifest, install files and a submission or install checklist, so it's a one-shot install there.
The three zips, in plain words
- Skills zip — each skill is a folder with a
SKILL.mdinside. A skill is one job your plugin knows how to do (like "Build the Q4 plan"). This is what you upload to Claude one at a time. - Agents zip — the "who". A named helper with a job, a tone and rules for when to stop. Claude Code uses these directly; anywhere else, the text works as a system prompt.
- Portable Plugin zip — everything together in the open Agent Plugins format:
plugin.json+skills/+ your reference files + your logo + starter prompts + a test plan. This is the one you upload to ChatGPT and Codex.
How the workspace is laid out
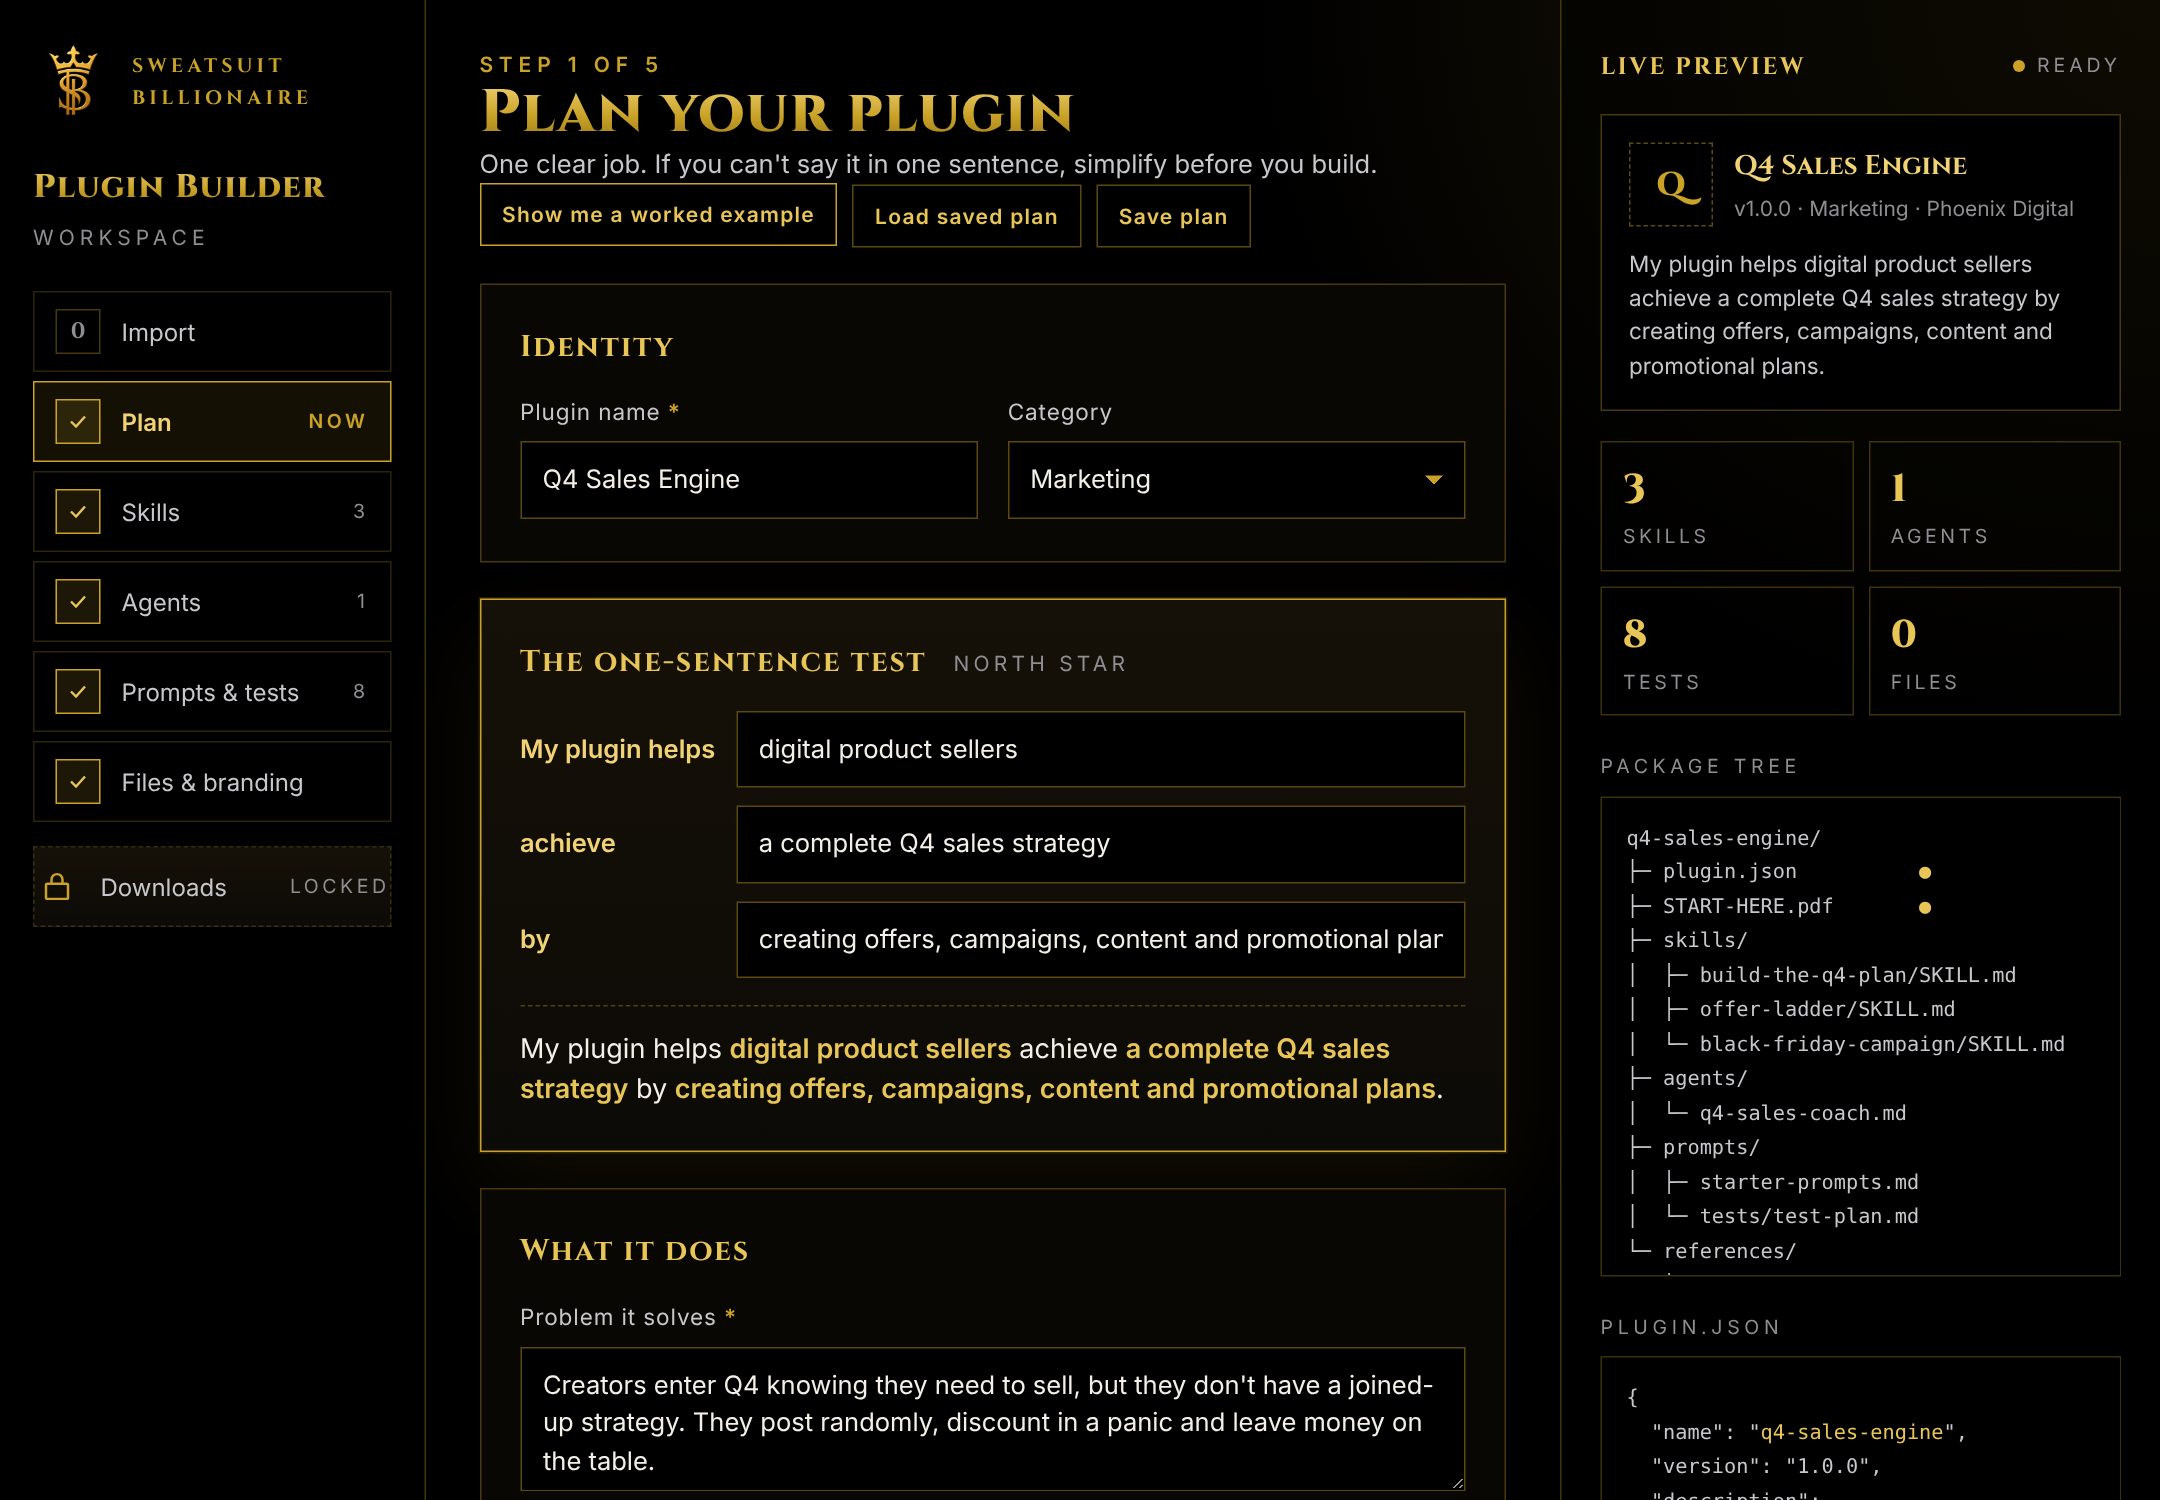
Steps run down the left rail: Import, Plan, Skills, Agents, Prompts & tests, Files & branding, then Downloads. Tap any step to jump to it; a tick means it's complete and the gold bar shows your overall progress. The middle is the step you're on. The Live preview on the right builds your plugin as you type: name, the one-sentence test, the folder tree and the plugin.json manifest. On a phone the preview folds under the page; tap Show to open it.
02Already have a custom GPT? Import it
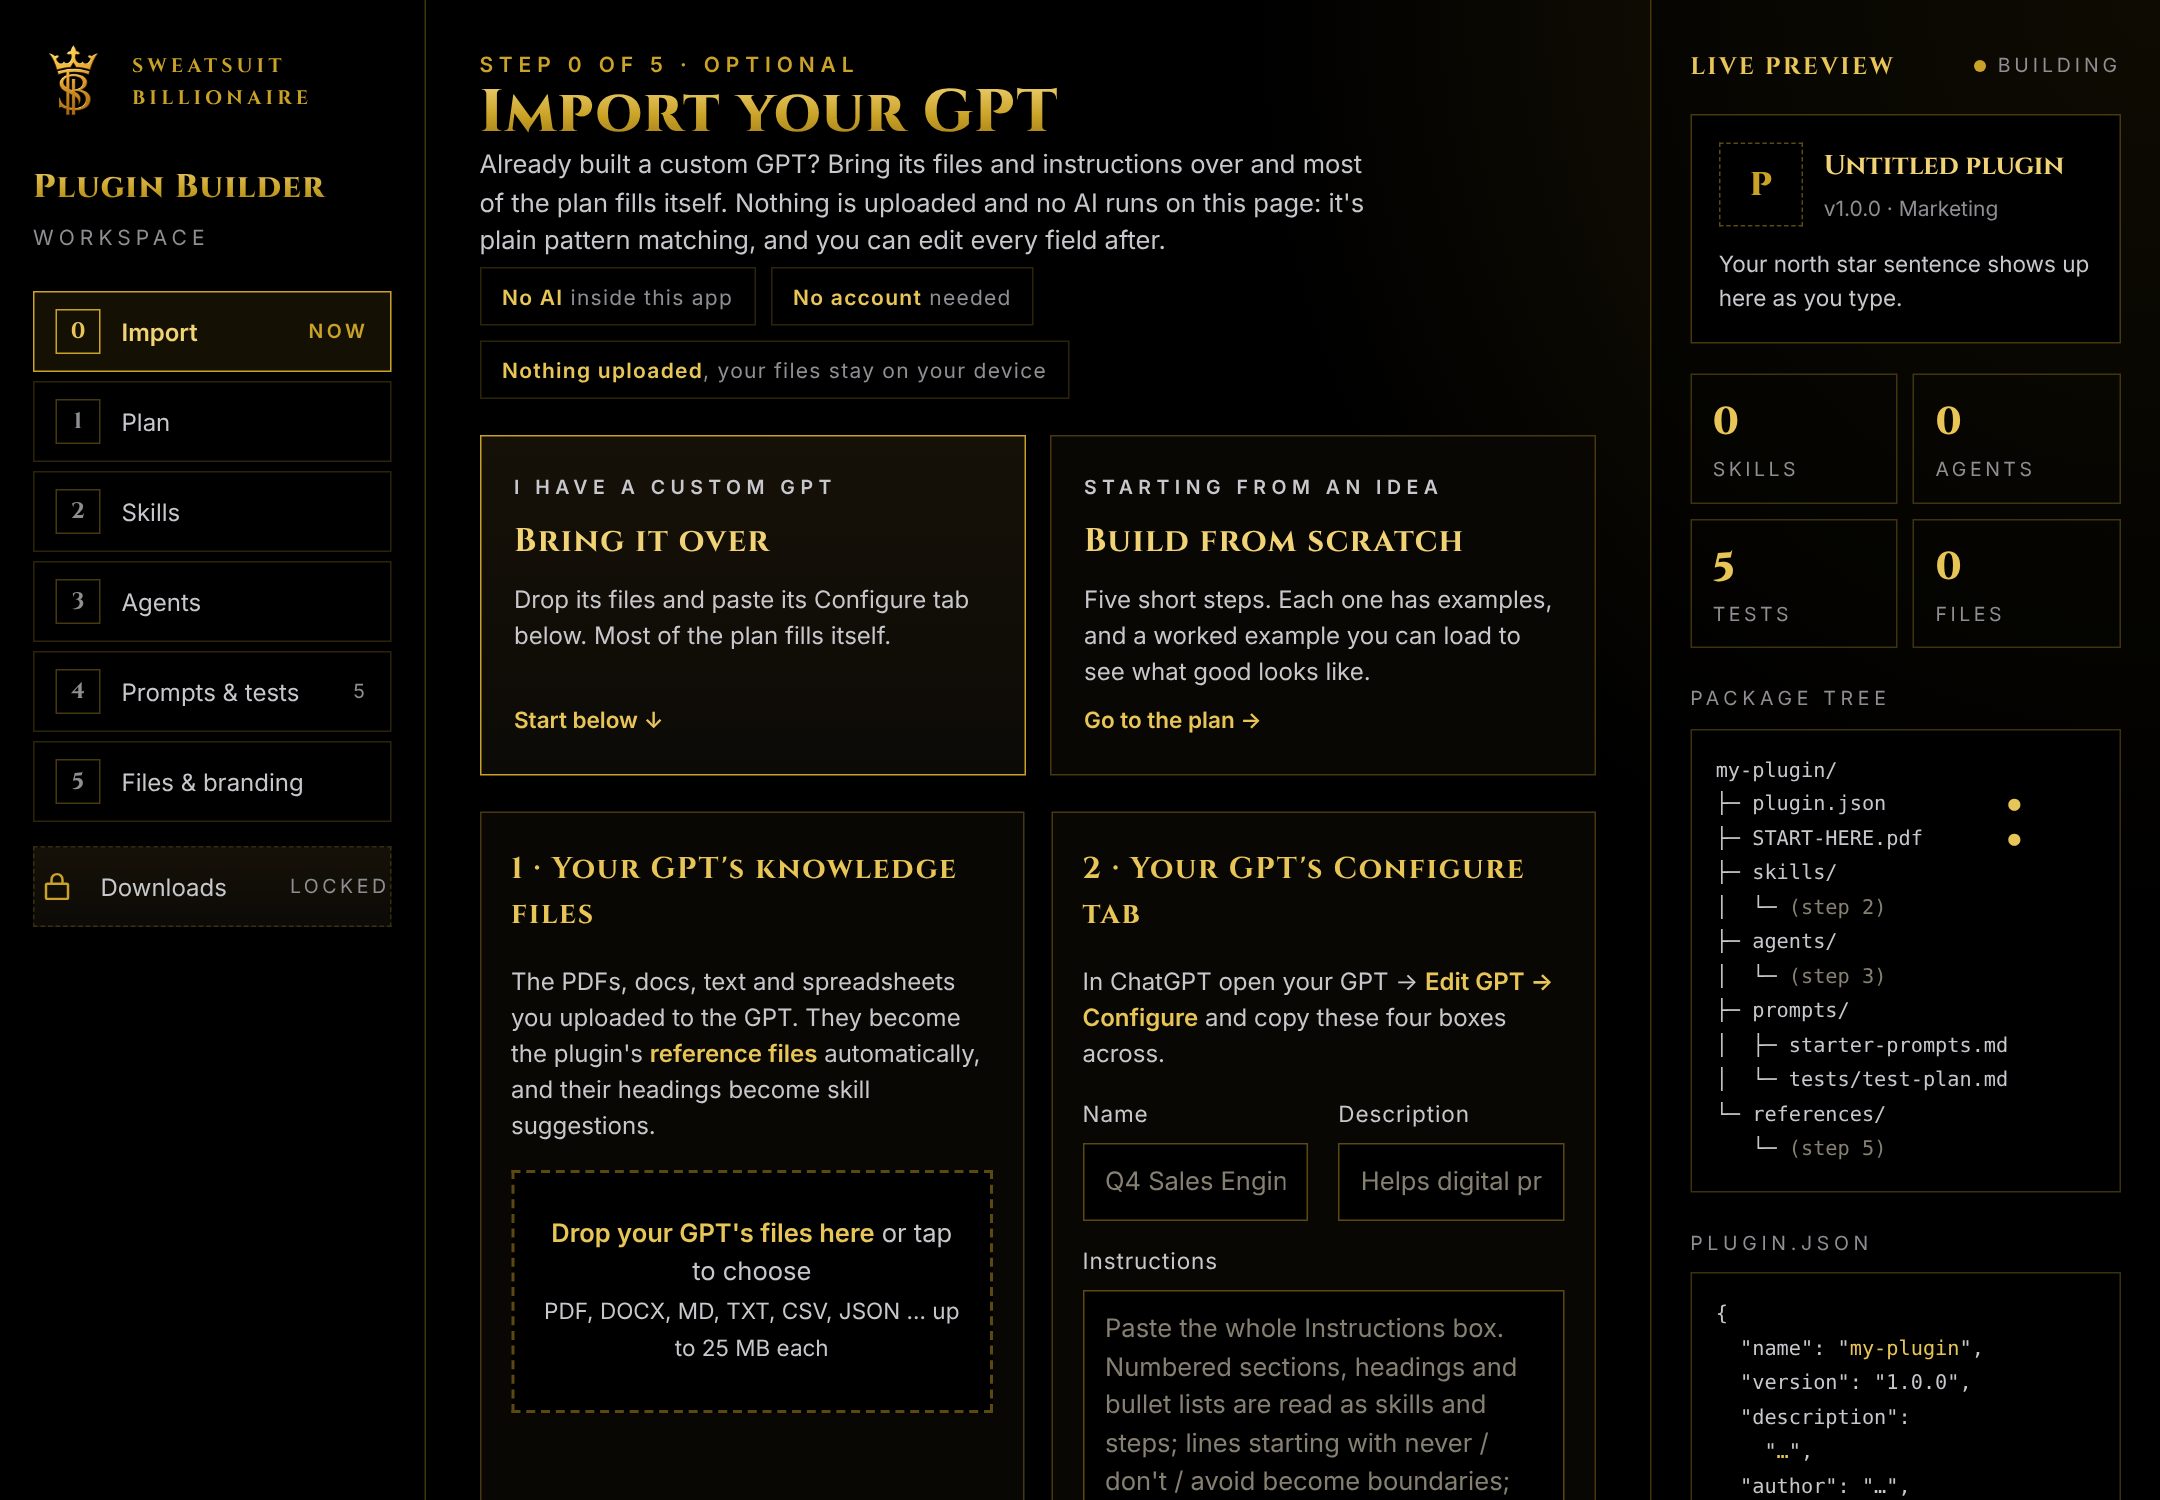
If you built a GPT in ChatGPT, you already did most of the thinking. Step 0 brings it across in three moves, and the plan fills itself. Starting from an idea instead? Tap Build from scratch and skip to section 03.
Move 1 · Drop in your GPT's knowledge files
Open your GPT in ChatGPT, go to Edit GPT → Configure and look under Knowledge. Those are the files you uploaded when you built it (PDFs, Word docs, text, spreadsheets). Download any you don't still have, then drag them all onto the drop zone (or anywhere on the page). They become your plugin's reference files automatically, and the builder reads their headings to suggest skills.
Move 2 · Copy the four Configure boxes
On that same Configure tab, copy Name, Description, Instructions and the Conversation starters into the matching boxes, then tap Fill my plan from this. The builder reads your instructions the way a person would: numbered sections and headings become skills, bullet lists become their steps, lines starting with "never" or "don't" become boundaries, lines about tone become your brand voice, and your conversation starters become the three example requests. A strip under the button shows what it found and what it didn't.
Move 3 (optional) · The exact fill
Want it word-perfect? Tap Copy the export prompt, open a chat with your own GPT, paste the prompt and send it. Your GPT answers with a block of text in the exact shape the builder reads. Copy that whole block, paste it into Paste your GPT's answer here, and tap Fill my plan from the answer. Every field fills precisely, skills included. Your ChatGPT does the reading; the builder just files it.
03Filling in the builder (and the shortcuts)
Five short steps. Stars mark the boxes that must be filled in; everything else makes the plugin better but isn't required. Next never blocks you: if something's missing it flashes gold and lets you carry on; you can come back any time.
Shortcut A · The worked example
On the Plan step tap Show me a worked example. The whole builder fills with a finished plugin (Q4 Sales Engine) so you can see what a good answer looks like in every box. Read it, then tap Start a new plugin and write yours.
Shortcut B · Screenshot it to an AI
Screenshot a step, hand it to any AI you already use (ChatGPT, Claude, Gemini, Copilot) with the prompt below, and paste its answers into the boxes. Two minutes a step.
Step 1 · Plan
Name your plugin and pass the one-sentence test: My plugin helps [audience] achieve [outcome] by [method]. If you can't say it in one sentence, the idea is too big — pick one job. Then write the problem it solves, three things people should be able to ask it, what it should not do, and how it should sound. Each of the three requests has a Make it a skill button: one tap sets up a skill with its name and trigger filled in, because each thing people ask for usually wants its own skill.
Step 2 · Skills
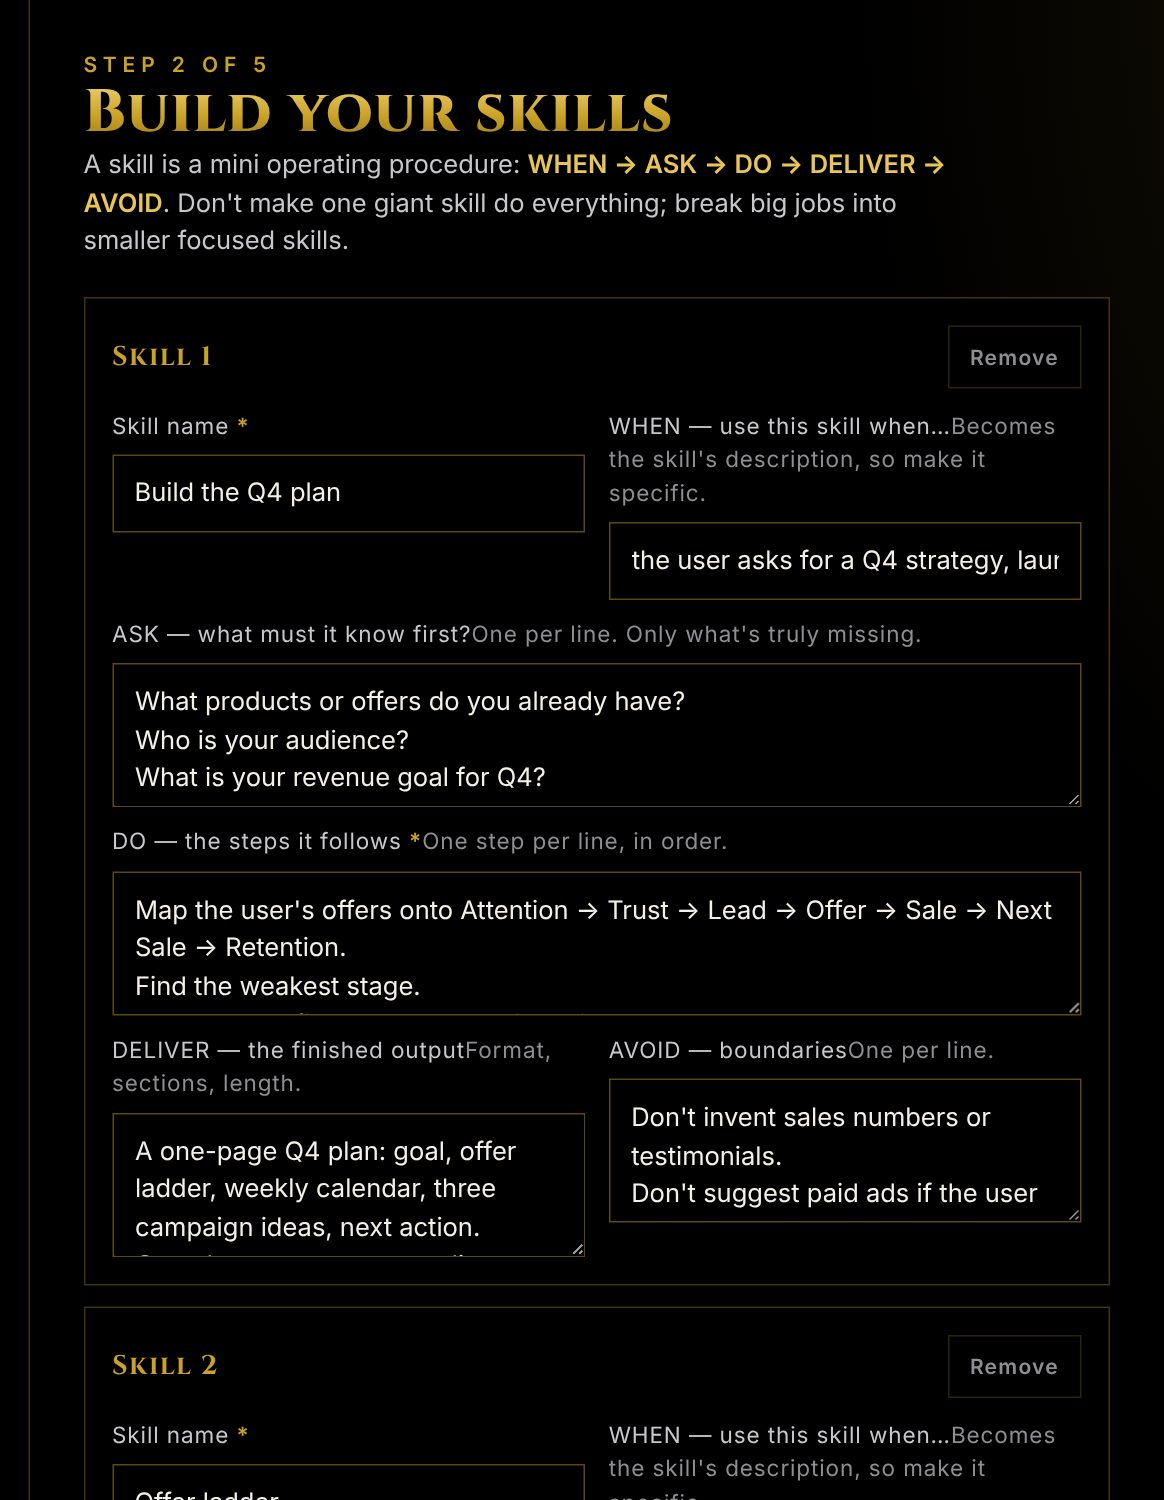
A skill is a mini operating procedure. Every skill follows the same formula: WHEN (when does it kick in) → ASK (what does it need to know first) → DO (the steps, one per line) → DELIVER (what the finished answer looks like) → AVOID (boundaries). One or two skills is perfect for version one. Don't make one giant skill do everything. Left a WHEN or DELIVER box blank? Fill blank WHEN / DELIVER boxes for me writes a sensible default you can edit.
Step 3 · Agents
Tap Draft an agent from my plan and the builder names a helper, writes its one-line job and tone from what you already typed, and ticks every skill. Edit it, or write your own: a name, a one-line job, which skills it runs, the tone, and when it should stop or hand off ("if asked about taxes, say it's outside scope"). One agent is plenty.
Step 4 · Prompts & tests
Already filled in from your plan. Starter prompts are what people see as suggestions; tests are what you'll run before sharing. Edit anything. "Re-fill from my plan" resets them if you change your mind.
Step 5 · Files & branding
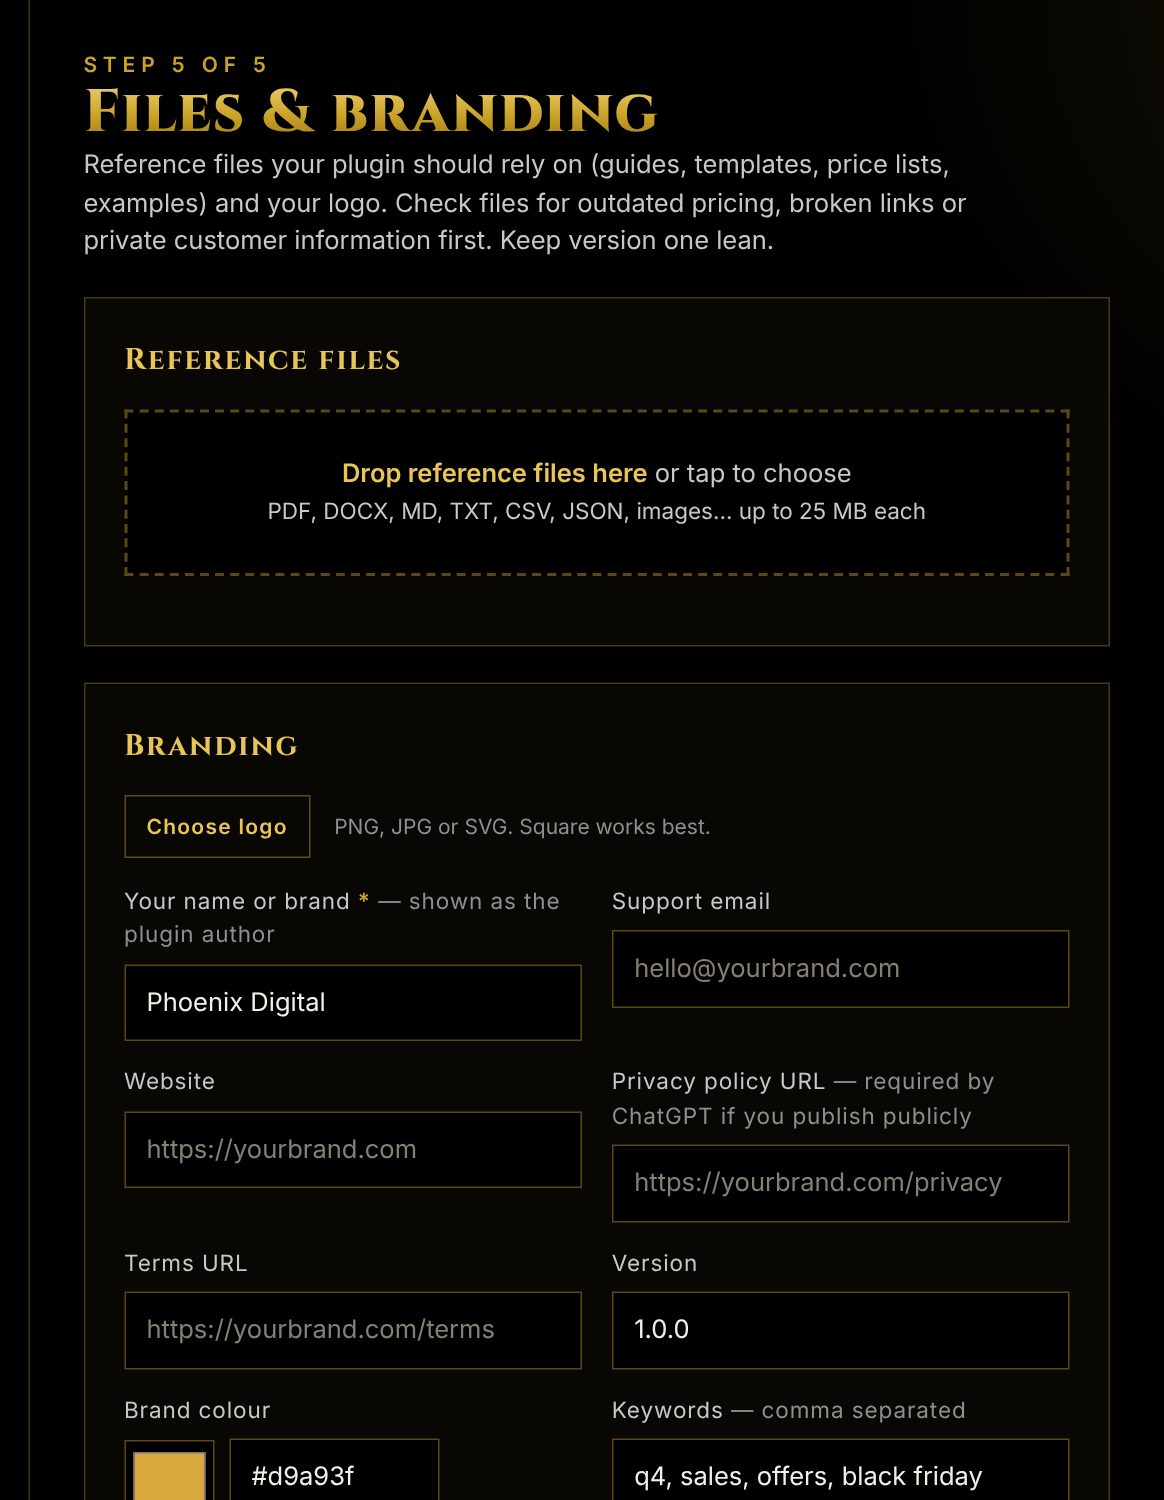
Drop in the files your plugin should rely on (price lists, templates, guides, examples), add your logo, and put your name or brand as the author. Check files for old prices, broken links or private customer info first — keep version one lean.
04Download your zips
Tap Downloads in the left rail. A review card at the top lists anything still missing and jumps you to it. If the step says Locked, tap the access link from your receipt page or type in your access code (see section 09). Then tap a zip; it builds instantly and lands in your Downloads. Download everything I've unlocked grabs every zip in one go.
Each zip is named after your plugin, for example q4-sales-engine-plugin.zip. Inside the Portable Plugin zip you'll find:
q4-sales-engine/
├── plugin.json            the manifest (name, version, author)
├── README.md              what it is + how to install it
├── skills/                one folder per skill, each with SKILL.md
├── agents/                your agents
├── references/            the files you dropped in
├── assets/logo.png        your logo
├── prompts/               starter prompts + build prompts
├── tests/test-plan.md     your 5 + 3 tests
├── PLAN.md                your filled-in worksheet
└── START-HERE.pdf         this guide
05Install in ChatGPT
You need a ChatGPT Work (or Business/Enterprise) account with Plugin Creator access. Start private, test it, then publish if you want.
The easy way · Plugin Creator
- Unzip the Portable Plugin zip (or the ChatGPT Pack) on your computer. You'll get a folder named after your plugin.
- In ChatGPT, start a new chat and type @Plugin Creator, then describe what you want. If you have the ChatGPT Pack, open
CHATGPT-SUBMISSION.mdand copy the ready-made prompt from section 1. - Attach your zip (or the folder's files) when it asks, or use "Upload plugin" if your account shows it. Plugin Creator reads
plugin.jsonand yourskills/. - Say "keep it private while I test it." Review what it created: the skill instructions and the included files should match what you typed.
- Open a fresh chat, select your plugin, and run the tests in
tests/test-plan.md.
Publishing to the directory (optional)
When it passes your tests: open the plugin submission portal, choose Create plugin → type Skills only → upload the complete zip → fill in the listing (the ChatGPT Pack's CHATGPT-SUBMISSION.md has every field written for you: name, short and long description, category, links, three starter prompts, five positive and three negative tests, release notes) → Submit for review. A new public submission needs the full zip, not just changed files.
06Install in Claude
Two ways: the Claude app (web, desktop, phone) takes skills one at a time; Claude Code takes the whole plugin.
Claude app (claude.ai) · skills
- Unzip the Skills zip. Each folder inside is one skill.
- Zip one folder on its own (right-click → Compress on Mac; right-click → Send to → Compressed folder on Windows). The zip must contain the folder with
SKILL.mdinside. Claude Pack owners: skip this — theskills-for-claude-ai/folder already has each skill zipped. - In Claude go to Settings → Capabilities → Skills → Upload skill and pick the zip. Repeat for each skill.
- Start a chat and ask for the thing your plugin does. Claude picks up the skill automatically when the request matches its description. You'll see the skill's name light up.
Claude Code (terminal) · the whole plugin
Unzip the Claude Pack (or the Portable Plugin zip) and copy the pieces into your Claude folder:
mkdir -p ~/.claude/skills ~/.claude/agents ~/.claude/commands
cp -r skills/*     ~/.claude/skills/
cp    agents/*.md  ~/.claude/agents/
cp    commands/*.md ~/.claude/commands/    # Claude Pack only
Then in Claude Code type / — your plugin's commands show up, one per skill. The proper installable-plugin route (a Git repo with .claude-plugin/plugin.json and a marketplace file) is explained in the Claude Pack's CLAUDE-INSTALL.md.
07Install in Codex & others
The Portable Plugin zip follows the open Agent Plugins 1.0 standard, which OpenAI, Codex and a growing list of tools read directly. For Codex: unzip it into ~/.codex/plugins/ (the ChatGPT Pack also includes a .codex-plugin/plugin.json fallback). For anything else: point it at the folder, or paste a skill's SKILL.md text as instructions. It's just clear, well-structured text.
08Test it before you share it
Don't publish after one test. Open a fresh chat, pick your plugin, and run every line of tests/test-plan.md. Fix the wording in your SKILL.md (or in the builder, then re-download), and run the same prompts again.
- A simple request works
- A detailed request works
- With details missing, it asks once and then delivers with clear placeholders
- Each skill kicks in when it should
- It uses your reference files instead of making things up
- The output looks the way you described in DELIVER
- It sounds like your brand
- Off-topic requests get a polite "that's outside what I do"
The final human test: was it useful? Was anything confusing? Did it ask unnecessary questions? Would a beginner understand the output? Would you use it again? Build → Test → Improve → Repeat. Version one doesn't need to be perfect; it needs to be useful.
09Your access code
Right after checkout you land on a thank-you page showing your code, something like SBAPP-7KQ2-M9XR. Tap Open the Plugin Builder there and this device unlocks on its own. Save the code: it works on up to 5 devices, and you can type it into the builder on your phone, laptop or anywhere else. Platform packs have their own code; entering it also unlocks the builder.
Lost your code? Email [email protected] from the address you used at checkout and we'll find it.
10Help
Stuck? Email [email protected] and we'll get you sorted.